Keeping Busy, Staying Sane

Well this is not how I pictured April panning out.  I’m not one to plan out my life weeks in advance, but not leaving my house for four weeks straight was certainly not my ideal scenario, or yours I’m guessing.  Regardless, I hope you are healthy and safe wherever you are.  I hope you have food to eat and loved ones to check in with.  As many negatives as this situation is presenting, there are definitely some significant positives.  However, I’m not about to sugar coat it.  Lots of ups and downs in our household.  Thankfully more ups.  I don’t have any answers or solutions but I can say Cactus and I do infinitely better on the days when we each get an hour of ‘me’ time.  Preferably outside, with some fresh air, doing something active.  It clears my head, helps me slow down the thoughts that were starting to go on over drive, and gives me the mental re-boot to make the rest of the day more enjoyable.

Besides checking the calendar to remind myself what day it is, here’s what I’ve been up.

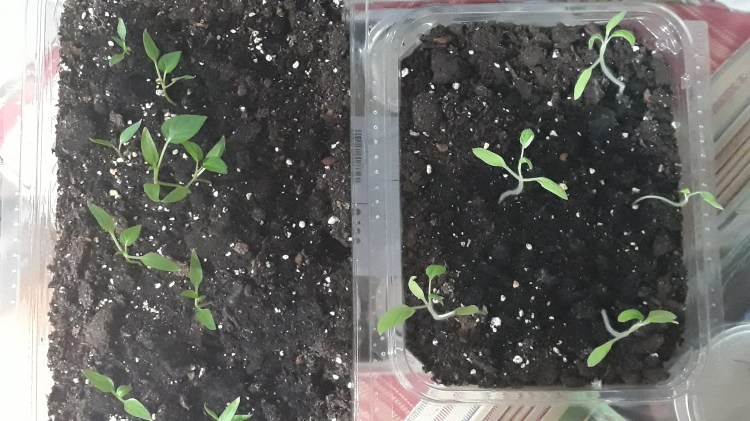
Nursing my seedlings. I’d say about 50% of my seedlings are going strong.  The peppers are on fire.  A bunch of my tomatoes and peas fizzled out and I think I’m to blame. I put them out on a really warm day for some fresh air and I think it shocked them.  If you are approaching your last frost date, be sure you do the hardening off gradually.  Like 2 hours one day, then 3 hours, then 5 hours, then 6 hours, etc.  It takes a little more attention but it’s worth it to not kill the plants you were just babying for the last 8 weeks.

Pepper and tomato seedlings that are strong healthy
8 week old pepper (left) and tomato (right) seedlings doing just fine…
Pea, pepper and tomato seedlings that are struggling
8 week old pepper (top) and pea (bottom) seedlings doing less than fine (there was not that much space between them – I’ve lost about 10 plants).

Planted my cool crops.  I sowed my kale, onions, carrots, beets, cauliflower and broccoli directly in the ground in the beginning of April.  Last year, I didn’t attempt a Spring garden so I’m curious to see if they take hold.  I had a great kale and beet harvest, but I did them in the Summer just a single time with no succession planting for the Fall.  I’m hoping that my rotation and all the manure and compost I’ve added make a difference.  Even though I have read about 100 times that soil testing is a must, I have not yet done it.  I am promising myself I will do it at the end of the season this year so I can amend as needed for next year.

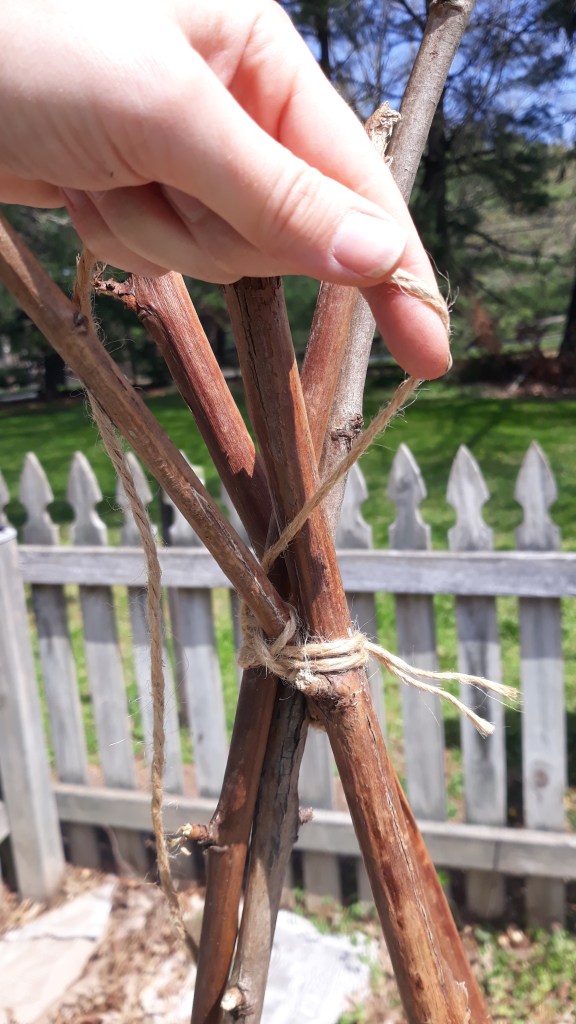
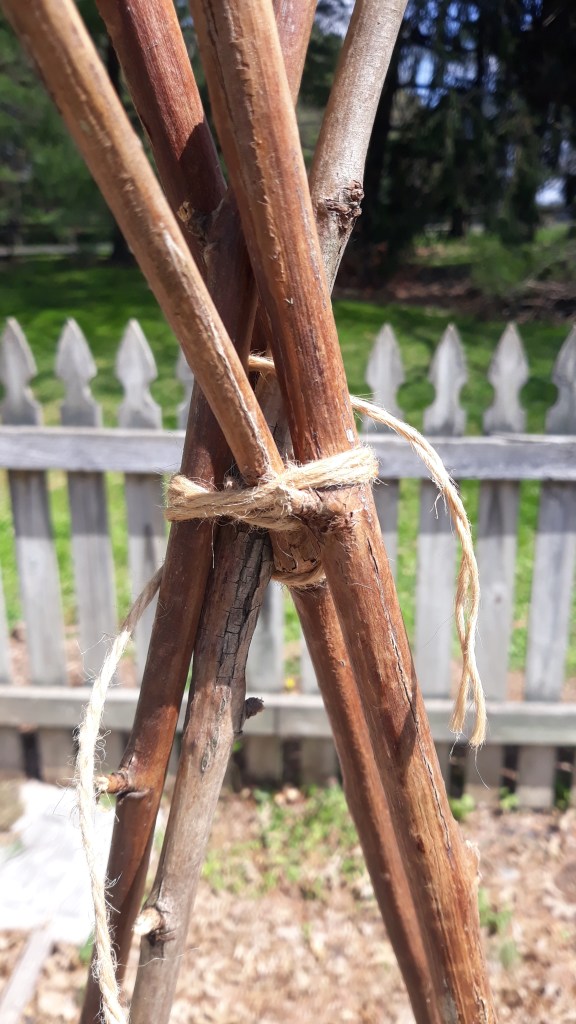
Homemade teepee trellis. I experimented making a teepee trellis with some old blackberry canes.  I’m not sure how sturdy this will be.  I really want to use bamboo and I see walls of bamboo in yards when I drive around town, but I haven’t had the courage to knock on someone’s door and ask “Can I cut a few of your bamboo stalks?”

Blackberry canes lying on the ground
Some blackberry canes that I pruned for a potential teepee.
Four blackberry canes standing up to be secured as a teepee trellis
Four blackberry canes standing up for a teepee trellis.
Teepee trellis made out of four blackberry canes
Securing the four blackberry canes with twine.
Teepee trellis made out of four blackberry canes
Blackberry cane teepee trellis secured – wahoo!

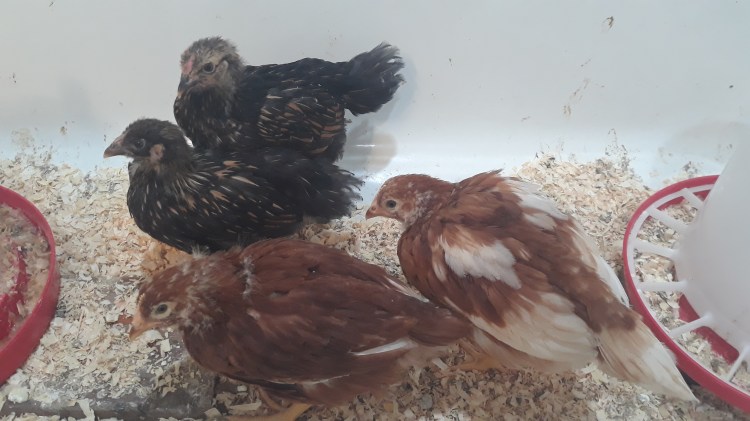
Chick wrangling. Our four chicks (2 Isa Browns and 2 Gold Leaf Wyandottes) are alive and well in the bathtub.  They are getting pretty big and almost all of their fluffy down is gone so we’ll be ready to take them out and introduce them to the rest of the flock in the next two weeks I think.  I’m a little disheartened that two appear to be roosters.  I could be wrong *fingers crossed*.

One month old 2 Isa Brown and 2 Gold Leaf Wyandottes chicks in white bath tub
Look at the comb coming in so strong on the dark one in the back – grrrrr. You better not be a rooster!

Seed Start Now for Your Summer Garden

It’s the most wonderful time of the year (you know the tune).  We’ve spent the majority of our days indoors for the last few months, with more darkness than light.  And it wasn’t even a harsh winter in the Mid-Atlantic.  Nevertheless, I think our bodies follow the seasons to some degree (or would if we listened to them!) so I am ready for the re-awakening that Spring represents.  Grasses growing, leaves budding, flowers blooming.

Early March is when I need to start seeds for a few of the crops that need 6-10 weeks of lead time before going outdoors into the ground after the danger of frost has passed.  You don’t need to do this for everything, and if you live in the warmer zones 8 and 9 of the country you likely don’t need to do this at all lucky ducks. 

How do you know if you need to seed start?  If you google your last and first average frost dates that will give you the length of your outdoor growing season.  For example, if your last frost date is May 1 and your first frost date is October 1, you have about 150 days in your growing season which could limit the crops you can grow that need 90-120 days of warm weather or cool crops that you want to get a harvest from in the spring and fall.  For that reason, it’s pretty common to seed start the following:

  • Broccoli – 6-8 weeks before last frost
  • Cabbage – 6-8 weeks before last frost
  • Cauliflower – 6-8 weeks before last frost
  • Onions – 10-12 weeks before last frost
  • Peas – 8 weeks before last frost
  • Peppers – 8 weeks before last frost
  • Tomatoes – 8 weeks before last frost

Growing medium to use for seed starting: it is recommended to not just go out in your yard and get a bucket of dirt.  You don’t know what bugs and bacteria you may be bringing into your home.  This is the time to buy a bag of organic potting soil for veggies.  You can make your own using 1/3 each of compost, vermiculite and peat moss but I personally have never done that.  You should also pasteurize the soil by baking it.  Not gonna lie, I skipped the pasteurizing step this year so I will let you know what happens.

Containers to use for seed starting:  There are tons of options for containers that you likely have on hand (I always try to re-use something):

  • Egg cartons – any paper or plastic egg carton will work well.  There are pros and cons for each.  The paper carton can be cut up and you can plant the seedling right in the ground when the time comes, but it doesn’t have a lid that light can get through.  Plastic cartons essentially create their own greenhouse and are reusable. The plastic cartons will also keep moisture better than the cardboard.  I used cardboard last year and will again this year.
  • Toilet paper rolls – since everyone ran to the store to get TP due to COVID-19 you likely have a ton of toilet paper and what better use for the empty rolls than some seed starting.  Just line them up vertically in a tray and fill with your growing medium.  Check out Preparedness Mama for her demo.
  • Berry containers – similar to the egg carton situation in that the container will create its own greenhouse effect.  The only difference is that you don’t have the separate sections for each seed.
  • Be creative!  My goal is to always reuse something.  Some empty tissue boxes, a clamshell tray that figs came in, a baby wipe container, or the little cartons that mushrooms come in.
Starting my seeds in an egg carton.

Sunlight needs: your little babies need at least 12-14 hours of sunlight.  If there is a sunny window in your house that gets southern exposure for the majority of the day and isn’t too drafty, then you’re golden.  If not, you probably need to get a grow light.  This being my second year starting seeds, I have not invested in a big light setup.  I have used a standard lamp with an adjustable neck so that I can move it closer to begin with (4-6”) and then a little further away as they get bigger (6-10”). 

Now that you’re all set up, enjoy starting your seeds and get excited for the bounty to come!

Plant-based Progress and YOE

I’m very efficiency focused.  I like to be able to measure what I’ve done and tangibly see the results.  I like to achieve goals and give myself a little pat on the back upon doing so.  Man do I love checking something off my list that has been a work in progress for weeks or months (anyone struggling to get all their tax documents together??  Can I get an Amen!)

At the start of 2020 I said I wanted to make an effort to eat more plant-based meals.  Well, that is not a SMART goal – specific, measurable, attainable, yadi yada.  So I wanted to circle back to that and figure out how, at the end of the year, I can say I achieved it.  

I’m a menu planner so each Sunday I make my list of meals for the week.  As a first step, I wanted to ensure at least one dinner was plant-based, meaning heavy on vegetables and fruits and if I could swap out an animal-based protein for something plant-based I would.  An important note about my menu planning is that I aim to get two dinners out of every meal (again, I like efficiency and don’t want to spend 30-45 minutes cooking every night but also want to eat homemade, healthy meals).

In January, here’s what I did –

Week 1: I just swapped out regular meatballs, I usually buy turkey meatballs from Trader Joes, for this plant-based version.  They were truly tasty.

12 Plant-based meatballs by Pure Farmland

Week 2:  Made fajitas without the chicken and steak and instead did some yummy cuban black beans with rice, avocado, lettuce, tomato, sour cream and cheese.

Week 3:  Tried a new lentil soup recipe that was not amazing, but it was tasty with fresh bread and olive oil and spices for dipping (disclaimer: I can make myself eat anything that I believe to be healthy).

Week 4: I attempted Korean beef wraps and instead of using beef I used these Beyond Beef plant-based crumbles.

Plant-based ground beef crumbles used for Korean beef wraps

In February –

Week 1: I went crazy this week and went for two dinners (aka four!).  Ravioli soup and fresh bread, and butternut squash risotto with sauteed veggies.

Week 2: I did a broccoli mac and cheese with collard greens and white beans on the side.

Week 3: I am a huge fan of breakfast for dinner so made a green chile quiche that was deeelicious.

Week 4: This is the only week I’m slacking on. Will likely switch out shrimp for chicken in a fried rice. That’s kind of a cheat I think.

Learnings:

– Soup is a very easy way to increase plants and reduce animal products.  I can pretty much make any green leafy item, carrots, celery, beans, onion, and whatever else is in the fridge into a tasty soup.

– I have a tendency to use cheese as a substitute for meat, but that is still not the healthiest.  Step in the right direction though.

YOE Update – The Year of Enough

This has been an interesting mindset to examine within myself because I don’t consider myself a material girl (cuz we’re living in a material world…).  So far, I have largely been trying to check my knee jerk tendency to see something and then immediately go online and buy it.  Kind of a double-edged sword this “get it instantly” world we now live in.  There’s no longer the gratification of saving and working toward something, it seems to only be “I want it, I must have it NOW.”  Saw a hilarious comedy special on Netflix by XXX where he said the next phase is for Amazon to send us stuff before we even order it – they need to predict what we want before we even know.  Funny and sad.

Nothing majorly measurable with my YOE efforts except the pause I’ve been trying to insert before a purchase.  I figure if I wait a day or two and forget about it, I really didn’t need it.  If it keeps popping into my mind, I’m trying to be more creative with how I could get a used or recycled version.

Anybody else trying to enjoy what they have more?  It’s a freeing feeling to have all you need (and I understand the privilege baked into that statement).

Farm Charm Barn Gets Winded

We’ve had some unseasonably warm and windy days here the past few weeks.  We’ll get a few very cool days in the low 50s and then a day that shoots up to high 60s or low 70s.  I think those weather fluctuations contribute to the crazy wind. On Halloween night, the winds were 30-40 mph I think.  As a result, our beautiful old barn sustained some damage to the roof. I didn’t notice the chunk of the roof that was blown off until two days later and called our insurance right away.  

I’m not exactly sure how old the barn is but the house dates back to 1890 so I would have to guess the barn isn’t that much younger.  I LOVE this barn! It’s truly one of the things that makes me inexplicably happy when I pull into our driveway at night after work or when I walk out the door on weekend days as we are doing chores in the yard.  I’m not exactly sure what the right word is to describe how it makes me feel, but something about it’s age, structure, heritage, simplicity, and traditions evokes stability and the feeling that I am home.

Farm Charm Barn after some strong winds
Oh beautiful girl! You are so impressive.

We’ve had a few contractors come out and one barn specialist to get their opinions on repairs.  We want to take care of it and maybe someday turn it into something that other people can enjoy too.  Cactus wants us to have some sort of children’s attraction on our property with a petting zoo, seasonal activities, etc.  I say absolutely not to that idea but perhaps there is some other option we haven’t yet considered.

Farm Charm barn after some strong winds
Farm Charm Barn looks so sad 😦 Don’t worry, we’ll get you all fixed up

In the meantime, we’ll be figuring out what to do for the roof, and any other maintenance for the siding and foundation.  If you know any good barn repair people, please send them my way. And if you’ve seen any beautiful barns, please send a picture my way.

Getting Crafty with Gelati

I would not put myself in the crafty bucket.  When I scroll through Instagram and Pinterest and see the amazing things that women come up with, my jaw drops and I am in awe of the creativity that oozes out of some people (and yes, I specifically meant to say women; guys are creative too but they typically get all the recognition they need).  Often it is so simple yet brilliant.  

Let me be clear, that is not what I aspire to.  However, when I have a moment of inspiration I like to jump on it.  I have read that creativity is like any other muscle, the more you work it the stronger it gets.  So one week my mom indulged us with a few Talenti gelati flavors.  [Let me be absolutely transparent:  Talenti representatives, call me – I’m your girl.]  There was something about the container shape and size that made me not toss them in the recycling bin and instead I held on to the three pints knowing that I would find some magical use for them.

Pint gelati container with endless craft potential

Then a few days later when combing and braiding my daughter’s hair I thought it would be so handy if I had a few containers to keep all her hair clips, brushes, combs and products in.  Et voila!  

Pint gelati containers with endless craft potential

I decided to spray paint the pints different colors and then I would figure out later how to stick them together.  I also had a vision that they would be staggered in height somehow to allow for a more interesting visual. That was the tricky part .  Not sure I came up with the best solution but it works.  

Spray painting with my daughter was fun.  We had some leftover spray paint from some other art project I did a few years back when I was obsessed with Mod Podge.  All we needed was a few old magazines to set the pints on.

Pint gelati container with endless craft potential

I thought the writing on the pints was a sticker that I could peel off but I couldn’t find an edge.  For that reason, the yellow one took a few coats of spray but the maroon and teal were fine with a single coat.

Then I let my daughter choose the Park Lane washi tape embellishments and she pretty much put them on herself.  Pretty impressive for a 4.5 year old in my book.

Lastly was joining them together.  I’ll be honest these sat on my kitchen counter for at least a week.  Due to the rim with the rings, they have to be offset in height. My solution to this was to flip one upside down.  In retrospect, I think this would have worked better if I had five pints instead of three. Two could have been upside down and three right side up.  Once I lined them up to where I thought they looked good, I put a big rubber band around them to hold them in place and then went at it with my hot glue gun.  

Three pint gelati craft for easy storing of hair stuff, desk items

I think the finished product is cute and could honestly be used for so many organizing options – desk items, bathroom items, bedside table, small toys, other craft supplies, on and on.  And I’m sure someone craftier than I could improve on this exponentially. Enjoy!

The Wallpaper Takedown: 5 Tips to Save You the Trouble

For a change of pace, I thought I’d bring you a little farm project that involved the interior instead of the exterior.  Like everyone else on the planet, I LOVE me some busy wallpaper. Can I get an Amen? In our last house, I actually put up wallpaper on a single wall as an accent and truly enjoyed looking at it everyday.  I think I got the idea during one of my HGTV phases. I was probably transitioning out of House Hunters International (we’ve all gotta dream!) over to Income Property and I saw him redo a basement with this really awesome orange geometric print on one wall and I said “I must do this.”  In case you’re interested, the product I used was Graham Brown and I would totally use them again.  [Sidenote: can we talk about how much the dude from Income Property looks like Roger Federer, the tennis player?  They must be related.]

The thing about wallpaper IMHO is quantity.  Can you do wallpaper in every room? Umm, sure.  Far be it from me to yuck your yum. But you can’t do every wall of every room.  You’ve got to think about balance since in a normal day you’ll be walking from one room to the next and you need not be visually accosted every time you enter a room.  And I believe I’ve said before, we live in a farmhouse from 1890 so wallpaper actually fits the vibe but… I needed to tone it down just a tad.

I’ve never removed wallpaper.  Something to think about when you’re putting it up, “Will I be the one removing this?” as it may change your approach.  But I watched some youtube videos, talked to a couple friends and was like, sure, I can do this. Seems easy and straightforward.  Wrong, wrong and wrong. So to save you the frustration I experienced, here are the tips I wish someone had told me (that YouTube didn’t!).

1. Start with the smallest room/wall.

This is the one and only decision that went my way.  You never know what challenges you’ll run into that will delay progress or what other project will surface causing this one to be back burnered.  

The smallest wall I attempted first for wallpaper removal at Farm Charm

2. There is no single way to remove wall paper.  I tried these three combinations with about 20% success (and 56% frustration)

A. Roll fabric softener on to the wallpaper with a paint roller, let it soak in, do another coat.  Attempt to remove wallpaper.

B. Score the wall paper first, then do the fabric softener per above.

C. B + A only I substituted actual wallpaper stripping liquid + used a scraper to lift an edge of the dampened wallpaper.

None of these approaches allowed me to pull off sizeable strips of paper (picture how annoying it is to try to peel a price tag off a package and bingo, that was me).  I was getting shavings and slivers, especially after scoring the wallpaper, which was pretty bewildering because so many videos and links said the scoring was a critical step. I understood the premise to be that the adhesive must be loosened in order to remove the wallpaper.  But the fabric softener, wallpaper remover liquid, and scorer seemed ineffective in penetrating the adhesive. I don’t quite understand how you are supposed to penetrate a glossy-ish exterior without scoring, but then once the surface was scored it was too shredded.  

Farm Charm wallpaper take down project

3. Don’t spend a lot on any special tools or products.

I bought the Zinsser scoring tool, scraper and stripper.  I’m not saying these are bad products, they just didn’t work for me.  This goes back to tip #1 as well. If you start with a small room/spot you can experiment with tools you already likely have, like a paint scraper.

4. Probably the biggest predictors of success are whether the wallpaper was applied correctly to begin with and the surface to which it was applied.

If you are the one who is putting it up and taking it down, then congratulations!  But that brings up a whole ‘nother set of questions as to why you are putting up and taking down wallpaper just for kicks…  Two of the walls in this room appeared to be unfinished (just sheetrock drywall panels) underneath the wallpaper so I think that presented challenges with regard to how the adhesive set in.

Wallpaper Take Down project at Farm Charm
Never know what you will find under wallpaper. Look at that fun Southwest-inspired border up top!

5. Start with a steamer.  

This ended up being the one and only strategy that worked.  In all fairness, Cactus did tell me to try this first and I ignored him.  Not being one who steams or irons my clothes, I just didn’t think those little machines were legit.  Well, apparently they are and maybe you already have one or have a friend who has one. Many local hardware stores also rent equipment and I wouldn’t be surprised if they had a steamer for rent.

Bottom line, I don’t have any fail proof tips for you but when I attempt the next room (because we got four more rooms that have dazzling walls), I am going to start with the steamer.

We’re Jammin’… and I hope you like jammin’ too

We have had quite a bounty of berries for weeks now.  It’s been such a delight to be able to walk outside and pick a bowlful of berries to have on the kitchen counter for some “walk by snacking” or for an after dinner treat with a little scoop of vanilla ice cream.  

Luckily, our berry bramble is growing extremely well and we already have more than we can reasonably eat so I wanted to preserve some of it.  The simplest option in my mind is freezing them. I know that I should lay them all out in a single layer on a sheet pan, let them freeze individually so as to not have one big clump, and then put them in a freezer bag. However, I have found that I don’t eat frozen berries all that often throughout the winter.  People always suggest throwing them in muffins or smoothies which are good ideas, I just don’t happen to do it.

Instead, I wanted to try my hand at canning some of these berries into jam.  I know absolutely nothing about canning and was curious how complex it might be.  I started by watching some videos on youtube of course and one of my go to bloggers is Melissa K. Norris and she has a whole 4-part series on canning that is free and extremely informative.  I also read about it on the National Center for Home Food Preservation site.

Then I figured I should just give it a go.  This whole year, and these first few years, are all experimental in my mind.  I don’t want to set much in the way of expectations because I truly don’t know what level of effort and involvement any of this requires and whether I have the time and ability to do it.  For me it’s going to be a matter of finding the things I get the most enjoyment from and that also serve my family well. I’m not gonna struggle to grow something that only I like and I’m not gonna fight the Earth to grow something that just doesn’t want to grow (except an avocado tree!  I am going to grow one, I just have to).

So here are the basic steps I followed for making and canning my first ever blackberry jam*.

Part 1 – The Berries

Gathered about 5 pounds of berries.  I tried to get a mix of pre-ripe and ripe so that the natural pectin would be sufficient without having to add any.  I don’t fully understand the pectin conversation so I’m just gonna have to play around until I figure out how to get the correct gel-like consistency.

Rinsed them in a strainer and removed any stems and leaves that were in the bunch.

Blackberries from the Farm Charm bushes

Placed them in a sauce pan on medium high heat with about a cup of sugar.  (Disclosure, I actually tried this about a week ago and got to this step, ran upstairs to put some clothes away while the berries were on the stove, and got distracted doing other things.  I could smell the berries from upstairs and they smelled like a beautiful berry wonderland until they didn’t. All of a sudden I could smell burning and they were a darkened charred mess in the pan.  Sooo, don’t do what I did.) I suggest staying close by and stirring the berries often to keep an eye on how quickly they are breaking down. It didn’t take more than 5-10 minutes, but this depends on the fruit you are using.

Simmering my berries
Cooking the blackberries for canning

Mashed the berries a little so it was a uniform consistency and did the “spoon test” to check for done-ness.  I am not 100% confident the gelling happened to the correct degree but I’ll see what happens when we try the first jar of jelly.

Mashing blackberries
Spoon test for canning readiness

Part 2 – The Canning

Sterilized my jars.  I filled up the biggest pot we have and boiled the water.  I carefully placed the Ball jars inside. I read to put a cloth in the bottom so that the jars don’t knock around so I did.  I do not have true water bath canner. Again, I’m a total newbie at all of this so before I start spending chunks of change on the right equipment (which I fully support), I’m being creative with the tools and equipment I have.  

My 20 quart pot for canning
Sterilizing canning jars

Removed the jars carefully and placed them on a clean towel on the counter to dry.  Placing the jars in the boiling water and removing them was when I wished I had the proper jar lifters.

Canning supplies

Filled the jars with the berry compote.  To minimize spills and drips, I ladled the berries from the saucepan into a Pyrex measuring cup with a spout that would ease pouring.

Blackberry jam in my 4 cup pyrex for easy pouring
Pouring my first jar of blackberry jam

Put the lids and rings on the jars and carefully placed them back in the boiling water for 5 minutes.  They had to be completely submerged in water with about ¼ of an inch covering them.

Removed them from the boiling water and tested the seal.  There was no clicking and I could lift up the jar by just holding on to the lid on and it was completely fine.

Two jars of homemade blackberry jam

Now I have four jars of blackberry jam.  What will I do with it? I’m a huge fan of PB&J so that’s an obvious one but I also think this would be excellent on blintzes for a yummy weekend breakfast or a dollop on top of a bowl of plain yogurt.  I’ll let you know what else I come up with.

*I’m not recommending you follow these steps exactly; definitely consult a reputable resource on canning.