The Flocks Join Forces

As summer draws to a close and the days grow shorter, I find myself immediately thinking ahead to next year and starting to plan what I’ll do differently. However, I am also always trying to remind myself to stay present. Enjoy and appreciate where I am. Bask in the metaphorical sunshine of today because tomorrow may be rain. I find that a hard balance to strike. Being happy with where I am while also pursuing new possibilities and challenges. Anybody else struggle with this? I feel like most of the messages we receive are to not be satisfied with what we have, that happiness is just around the corner.

The changing seasons do help me appreciate the end of something and the possibility of what’s to come. The cyclical nature of life. That whatever it is, we’ll pass through it. And what may feel insurmountable today will equip us for the next challenge.

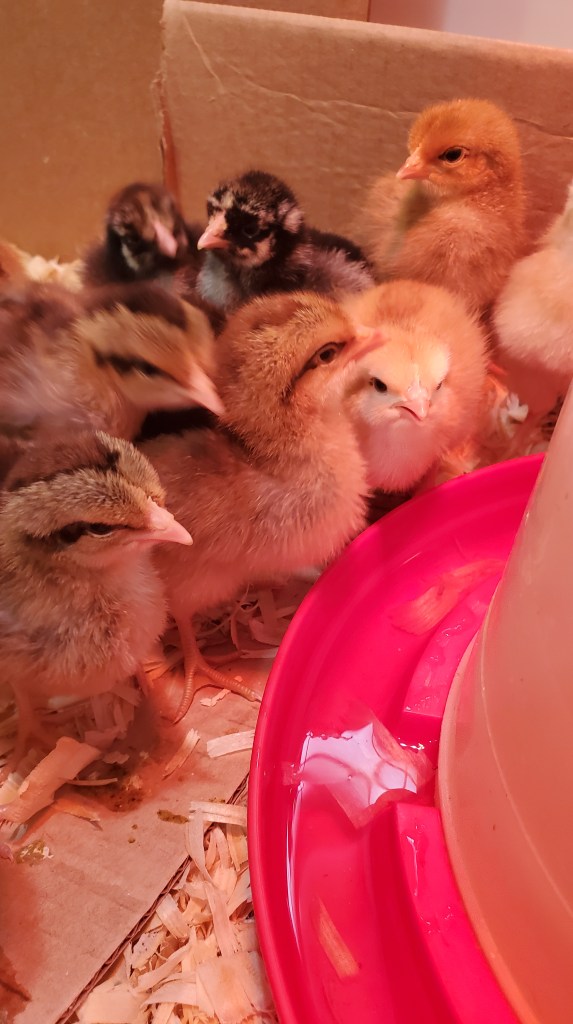
One of the recent changes Farm Charm had to go through was integrating our mature (19 birds) and juvenile (14 birds) chicken flocks. I’ve done this before pretty successfully and have usually waited until the juveniles were about 12 weeks old. This year I needed to do it closer to the 10-week mark because I was going out of town and the logistics I was performing each morning to separate the two flocks to ensure the babies had a couple of hours to eat their food while also making sure the hens could get to their nesting boxes was much too complicated to ask of our house sitter.

I joined the two flocks on a Saturday afternoon so I could watch them the rest of that day and all the next day while working in the yard. There were really no scuffles to speak of day one and the two flocks seemed to keep to themselves. The first night the babies did not know to go in the coop, which has happened before, so I shuffled them in at dusk. Sunday went smoothly as well throughout the day and once again I needed to scoot the babies in at sunset. By day three they were falling into a rhythm, eating separately each morning and then joining the whole group around midday.  The rest of the week had no major issues and I didn’t see any noticeable signs of aggression or dominance by the mature hens. A peck here and there but nothing to make me concerned.

There was a tragedy the following Saturday, day eight, that I won’t go into the details of but the bottom line is one of the juveniles got pecked to death by a hen. This was a pretty traumatic experience for me and made me quite upset that I had somehow let my guard down or not done my due diligence for this to even be possible.

To save even one person and bird from this heartache, I have a few tips to keep in mind when joining flocks.

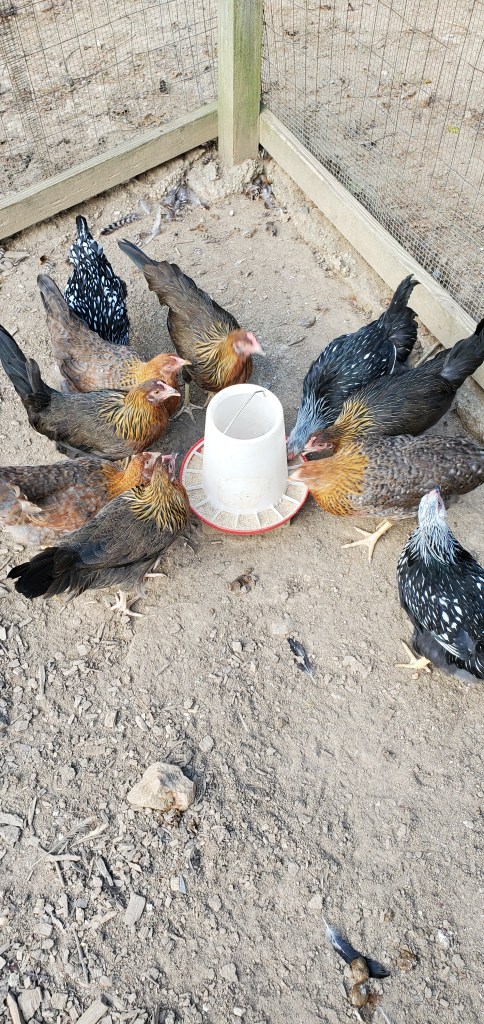
  1. Have multiple feeders and waterers so there is no sense of competition. Check that all birds can fit around the feeders.
  2. Be sure there are ample perches in the coop so that the respective flocks have their own space.
  3. Don’t ever let one or two of the juveniles get separated from their flock.
  4. If there is a smaller bird or runt, double and triple check that it stays with its flock during the day and at night.
  5. If there is pecking by the mature hens, create a partition of some sort so the juveniles have a retreat or safe space.
  6. Watch and observe regularly. I was out in the coop for about 30 minutes every day watching the ‘pecking order’ that was developing. The juveniles were being respectful of the hens and getting out of their way. And I didn’t see any hens being aggressive toward the juveniles other than a random peck when I threw out a few handfuls of scratch and a juvenile would bump into a hen.

Best of luck to everyone integrating flocks. If you have any tips, please share. And this time of year, you are likely seeing your birds start to molt so it’s a great opportunity to throw any last summer produce like tomatoes and herbs to your flock for extra nutrition.

Stop to Smell the Flowers

Where did summer go, folks? Seriously, when were kids summer felt like it lasted forever. You almost wanted school to start so you had something to do. And how come kids get 12 weeks of vacation each year but adults only get like 2 or 3?!? I’m pretty sure adult-ing is way harder than kidd-ing.

But, I’ll take the simple pleasures whenever they come and however I can get them. That’s where flowers come into my life. This summer I started experimenting with growing some cut flowers.  Mainly snapdragons, zinnias, dahlias, celosia, yarrow, marigolds, and cosmos.  I’ve had some fails and some wins. As much as I was hoping for big amazing blooms, I’m actually okay with the smaller production that has transpired. I’ve learned a lot about spacing, watering, and fertilizing. And of course, the adage of ‘less is more’ has been very applicable. 

I started with probably 15 different types of flowers (sweet peas, bells of Ireland, china aster, scabiosa, Mexican sunflowers) and I already know that next year I’m scaling back: snapdragons, zinnias, sunflowers, and celosia. That’s it.  Maybe some bupleurum 😊

I tend to take on too much at once, create a super complex schedule, and then about 6-8 weeks in I’m tired and falling behind. I always want things to turn out perfectly on the first try.  And that’s just not realistic. I’m saying all this because if you are in the same boat, I’m hoping you can cut yourself some slack. Life doesn’t usually go smoothly. The frustration and mishaps are part of the process and how we learn (saying this as much for myself as anybody else who needs to hear it). In general, as I try to take on more of a homesteading lifestyle while working full-time and raising two little kids, I just feel like I’m coming up short more of the time than not. And that takes the fun out of it. I want to enjoy the successes and learn from the misses. And smell the flowers along the way.

Another one bites the dust

Harvest time should be in full swing for most of us. I’ve got tons of tomatoes, piles of peppers, bunches of beans, okra, onions and cucumbers. Everything feels a bit delayed this year and I’m not sure if I did everything a couple weeks later or if the weather has just been unusual.

I’ll be honest in saying that August tends to be a bit rough for me.  The weather is sweltering. Mosquitoes are everywhere. My motivation is lacking. And my energy just isn’t where it was back in May.

One thing that hasn’t changed is my battle with the squash vine borer.  For the third year in a row, I have gotten precisely 1 zucchini before I walk out to the garden and see a sad, wilted plant, falling over and whispering “help me!” But it’s always too late. The damage has been done. It’s so frustrating!

This year I thought I was doing so well, dusting with DE around the base of the stem every 4-5 days or so and watching for signs of pests.  Then Ka-POW! Could I have done more to prevent this?

I’m wondering from other more experienced gardeners when you decide a certain crop just isn’t in the cards for you or your climate? The irony is that I don’t even love zucchini. But at this point it’s become a battle of wills and I refuse to lose.

Bird Beauty

We all have our own reasons for gardening. Self-sufficiency. Passing on skills from elders. Connection to nature. Regardless of motivation, I would say it’s always important to zoom out. See the bigger picture unfolding in front of you. A facet of gardening I never expected to appreciate as much as I do is bird life. I am certain that all my plants and flowers attract more bird life than if I didn’t garden.

I see them every morning and in the afternoon flying in and out of my garden, stopping at the feeder, and chasing each other from tree to tree. The most frequent are goldfinches, nuthatches, titmice, juncos, sparrows, cardinals, orioles, bluebirds, red-billed woodpeckers, and of course robins.

But a bird whose magnificence is truly breathtaking and I don’t think I ever saw in real life before last summer is the hummingbird. It will take your breath away every time. 

We bought a hummingbird feeder like this for our front porch.  I wasn’t sure if it was too close to our activity for the birds to feel comfortable frequenting it. But within a few days, Sha-ZAM! The sound of hummingbird wings fluttering is unmistakable. Like a mini-helicopter going by you.

If you’d like to see more hummingbirds in your yard, here are few ways to attract them.

  1. Get a feeder.
  2. Plant trumpet shaped flowers.
  3. Plant bright red flowers – cannas and gladiolas.

I say all this to say, whenever we can pause and look around, I’m almost certain you’ll notice something you hadn’t before and it will impress you.

Garlic Harvest!

Don’t know about you, but it’s getting pretty steamy in the Mid-Atlantic. As we head into peak harvest season, that’s when I find it most challenging to get out in the garden if I don’t go first thing in the morning. Every day is pretty hot and humid (think about walking through soup and you’ll get the idea) and we get a lot of afternoon thunderstorms that are quite strong.  We lost power the other day for about four hours after a storm but thankfully it came back on right around 9:30pm for bedtime.

Mid- to late June is typically the time when garlic is ready to be harvested. I planted a half pound of Music Garlic in early November last year so that it would get a good 7-8 months of growing time. Last November was so mild the cloves sprouted before December so I covered them with a really thick layer of leaves and then lightly covered the bed with a layer of cardboard for the winter. I removed the cardboard in early April.

April was still pretty cold and wet so in May I started checking on the garlic every week or so. I trimmed the curly scapes that shoot up through the center so that the growth and energy would be focused toward the bulb. Then throughout June I kept checking to see when the lower layer of leaves would turn brown. That’s the sign garlic is ready to be harvested.

Garlic Harvesting Tips

  1. When the lower layer of leaves has turned brown, pick a day or time when the soil will be relatively dry.  Not right after a big rainstorm or watering.
  2. Harvest carefully using a hand shovel to dig around and loosen the roots. You DO NOT want to just grab the stalk and try to pull it out. Be careful to not pierce the bulb as that will mean you’ll need to use that bulb sooner than later and it isn’t suitable for storing.
  3. Once you’ve dug up all your bulbs, no need to hose them down.  You can just shake or brush off the extra soil.
  4. Leave your garlic in dry, shady, cool place for 3-4 weeks so it can cure. I see lots of examples of people leaving them on a picnic table or extra piece of fencing that will allow for air flow. I left mine on our front porch because it’s shaded and gets the northern exposure so it’s a bit cooler throughout the day.
  5. After 3-4 weeks, you can trim the roots around the bottom and leave about a half inch on the neck. 
  6. Garlic should be stored in a cool location, out of direct sunlight, that gets good air flow.
  7. Eventually, you’ll want to store enough to plant your next crop and still have enough leftover for your cooking needs for the year (which is different for every household).

Happy Garlicking!!!

The Chicks are Here!

My chicks are here!  It seems like a really long time since I heard their sweet chirping and it is so adorable.

This time around felt as stressful as if I was giving birth to them myself. (Yes, I’m exaggerating.) The last time I ordered chicks from Murray McMurray Hatchery, they were delivered in April and I got more updates from USPS on their transit progress. This time, after being notified they shipped Monday evening, I heard nothing else until Thursday morning. And, as mama’s tend to do, all sorts of worries flooded into my head each day with them being so little and it being so hot.

Thankfully, they all made it safe and sound and are doing well. Two seemed quite weak and disoriented but I kept dipping their heads in the water with Sav-A-Chick electrolytes and they have caught up to the others. I hope I never stop getting a thrill from this experience of new life. 

If you recall, I had originally ordered 15 chicks made up of the following breeds.

  • Bielefelder – 3
  • Golden Wyandotte – 2
  • Blue Laced Red Wyandotte – 2
  • Silver laced Wyandotte – 2
  • Silver Polish – 1
  • Golden Polish -1
  • Whiting True Green – 4

Unfortunately, in early April due to HPAI, a couple of the breeds were impacted and here is what I was still able to receive.

  • Bielefelder – 3
  • Silver laced Wyandotte – 4
  • Whiting True Green – 4
  • Single comb brown leg – 4

I can’t wait to see how they look when they are bigger. For now, I’ll enjoy them as little fluffballs.

Let the Beets Drop!

Finally, it happened to me right in front of my face and I just cannot hide it. I love that jam! If you recall, my beet crop failed miserably last Spring.  I know most people are not huge fans of beets (you gotta get some rhythm, people! Oh the puns never stop), but for me this was a huge disappointment. There is not a salad I enjoy more than peppery arugula, sweet golden beets, a sprinkle of toasted pecans, some chunks of creamy goat cheese, drizzled with the easiest homemade balsamic vinaigrette (see recipe below). That’s just the perfect summer dinner with some warm, crusty French bread.

This spring, I was determined to succeed so I took a different approach and started my beets inside in early February. I did two 6-cells of golden beets and one 6-cell of ruby beets. And when I start seedlings, I always drop 2-3 seeds in a cell in a triangle formation so that I can get multiple plants.

I transplanted these in early April and should have harvested them by end of May (55-65 days usually) but I don’t know what happened. The weather kept flip flopping. We’d have 3-4 hot humid days and then a few cold days. I think I just wasn’t paying enough attention and more focused on getting my peppers and tomatoes planted. Then June came and life got busier with school getting out, planning for a vacation. La dee dah. You know the drill.

I ended up harvesting them on two consecutive days – all the golden beets one morning and all the ruby beets the next morning. I ended up with 17 of each. Never could have planned that synchronicity if I tried. I think they were all quite voluptuous and curvy.

If you’re planning on preserving, I’m sure you know you want to get them canned as quickly as possible to maintain flavor and freshness. That’s why I tend to do these things on the weekend. I’ll go out early in the morning when it’s still cool, scoop up whatever I’m harvesting, and get everything going on the stove while the house is still peaceful and quiet (as if, those words only describe my household if we aren’t home).

I followed this pickled beets recipe from the National Center for Home Food Preservation (what a mouthful!) and did a batch each morning of 8 pints. This one is super basic, so if you have a recipe you like – please share.

I don’t know why but canning always ends up being a 3-hour endeavor for me. I’m always looking for shortcuts and tips to save time while still doing it safely.

Here’s what I did:

  1. Boil the water to cook the beets. Once boiling, add the beets and cook for 25-30 minutes.
  2. While the beets are cooking, start heating the water for the water bath (this takes soooooo long). Simultaneously, I am heating the brine and washing my jars, lids and rings.
  3. Once the beets are finished cooking, let them cool for about 10 minutes then remove the skins and slice them up.
  4. Place the cut up beets in the brine for 3-5 minutes.
  5. Last, hot pack the jars, wipe the rims, put lids on top, and screw on the rings to fingertip tight.  Fingertip tight means you don’t grip it with the palm of your hand and make it crazy tight.
  6. Finally, if I timed it right, the water bath is boiling and then I can just slide the jars right in.

Typically, my timing isn’t great because I don’t multi-task well. Instead, there ends up being a decent amount of waiting between steps, which is how this takes 3 hours of my day.

I ended up with 16 pints of gorgeous golden and ruby beets. I’m super happy with this and look forward to enjoying these this fall and winter.

Easiest Homemade Balsamic Vinaigrette

  1. Pour equal parts extra virgin olive oil and balsamic vinegar in your dressing bottle. I usually eyeball about 3 tablespoons each.
  2. Add a teaspooon each of dijon mustard and maple syrup.
  3. Give a sprinkle of salt and pepper.
  4. Shake and enjoy!

Tomato Tips: The 5 Musts

I’m not sure there is a fruit or vegetable that better illustrates the benefits of having a home garden than tomatoes. As a kid, I DID NOT like tomatoes. I thought they had no flavor and were filled with this weird juicy somewhat gooey center. Only when I had a simple cherry tomato plant in a planter on my deck some years ago did I taste the ripe, flavorful goodness that tomatoes offer.

Tomatoes, peppers and beans are my main summer crops that I grow in bulk for preserving. So it’s important that I get as big of a harvest as possible for sauces, salsas, soups and stews.

If you want to ensure a strong tomato harvest, here are the ways to set yourself up for success

  • Trim all low hanging foliage. You don’t want any leaves touching the ground where they are more susceptible to soil borne diseases, like blight.
  • Get rid of the suckers. Suckers are the branches that grow in between the main stem and the branch.  They are exactly what the name suggests – they suck extra energy and nutrients out of your plant and fruits.
  • Support them. I’m a big fan of clipping them to my trellis. I’ve done the cages – nope. I’ve done the A-frame and string – not for me. The clips just make so much sense and are so precise and tidy.
  • Water from the ground. If you don’t want to invest in soaker hoses, typically $15-20 each, make sure you are watering at the base of your tomato plants and not showering on them from above.  This creates more risk of spreading disease and pathogens.
  • Cover your soil. Tomatoes need a lot of water and you’ll keep them better hydrated if your soil is covered.  Anything like shredded leaves, pine needles, grass clippings, or straw (NOT HAY).

May is the Month

Here in the Mid-Atlantic, May is “Go Time” for gardeners.  [Please get a mental image of the Grinch doing his workout to steal Christmas.] Our last spring frost #LSF is usually around April 20 or thereabouts but I like to use May 1 for ease in calculating start dates.

May is the month. This is when all the preparation and care of the last 2-3 months gets to become real. 

Here is a general to do list to work on throughout the month so that you are set up for gardening success all summer long.  Take your time. It doesn’t all have to be done in one day or weekend. And you will undoubtedly need to modify and re-touch things as the summer goes on.

Preparation

  • Weed your pathways and beds if you haven’t already. This takes regular upkeep but you want to minimize it as much as possible
  • Put down cardboard and a 3-5” layer of woodchips on all your paths to reduce weeds. Most places have free chip drops from nearby arborists. 
  • Prep your beds with a fresh layer of compost and manure if you can.  Craigslist is a great place to get cheep manure from a local horse farm.

Plantings

  • Harden off your seedlings by gradually exposing them to the great outdoors over a week. Just do a few hours the first day and add 1-2 hours each day so they can acclimate to the sun, wind, and other elements. If you buy seedlings from a nursery, then you can skip this.
  • Buy any seedlings that you didn’t start yourself or that weren’t successful. It’s okay, it’s all learning and there is always next year. Two-thirds of my tomato seedlings died from gnats this year.  Grrr!
  • Plant your seedlings later in the day on a cloudy day if possible and water them in well. It’s a big shock for these little babies so make it as easy as you can.
tomato seedlings that are damaged by gnats

Equipment

  • Get all your equipment and tools out of storage and located conveniently to where you will use them.  On a weekly basis I use a hoe, rake, hori hori knife, a bucket, watering can, and a wheelbarrow. I keep everything right at the entrance to my garden, organized in a pallet #pallet projects
  • Put up fencing and trellises as needed for your crops that will need support for climbing – pole beans, tomatoes, berries, etc.
  • Buy clips and stakes to help support.
  • Get a gardening belt for your gloves and snips. I also keep a tape measure in mine too. You can use an old apron or a fanny pack. No judgement here – I bet you look fly😊

Maintenance

  • Buy the fertilizer you will need for the season. I like the AgroThrive brand.
  • Decide on your pest management strategy.  Will you use BT (Bacillus thuringiensis) for X? Or DE (Diatomaceous earth) for Y?  Do you plan to use a spray?  If so, can you make an organic one yourself with natural ingredients? Or are you going to hand pick off slugs and remove eggs at 5am every morning? You won’t be able to prevent everything, there will be some losses. But get to know the pests most prevalent in your zone and get ahead of them.

Beautify

  • It can’t be all work and no play.  If the garden is your retreat, add some beauty and pleasure. Plant some flowers. Add a bird feeder or bird bath. Grow some flowery vining plants along a fence or trellis.

Poultry Problems

If you keep chickens, ducks, or turkeys on your homestead, I’m guessing you are paying close attention to all the reports and information circulating about HPAI – highly pathogenic avian influenza. This is the first time I’ve had chickens to worry about when an avian flu is widespread. It’s also strange to me that there have been a few odd sicknesses impacting birds over the last year. Something’s happening here… what it is ain’t exactly clear…

I’ve read a number of articles just to understand what precautions I could and should take to help protect my flock. To be completely honest, it’s quite confusing and I haven’t found anything to be that useful or clear with regard to prevention. I’m still not sure if there is anything I can do that will make a difference or if it’s just luck or bad luck of the draw as to whether your flock gets infected. Sadly, I did get an email from Murray McMurray Hatchery, who I had placed an order with in the winter for another 15 chicks, and they had a confirmed positive test for HPAI in one of their barns. Which means I won’t be getting the silver and golden Polish chicks I ordered, or the golden and blue laced Wyandottes. How sad for them. Truly tragic.

In the hopes of saving even one person from this heartache, here are the tips I’ve found.  These seem like standard good hygiene practices to follow all the time.

  1. Minimize the risk of contamination from outside your coop to inside your coop by doing the following:
    • Wash your shoes/boots before entering or wear shoe covers.
    • Use equipment and gear specific to your flock and nothing else.
    • Keep feeders and waterers in your coop so that wild birds aren’t using them.
  2. Keep your feeders and waterers clean by washing them often.
  3. Cover your pen or run so that droppings from wild birds can’t contaminate their space.
  4. Wild waterfowl carry high levels of the HPAI virus. Keep ducks and geese away from your flock. If you raise ducks, keep them separate from your other flocks.
  5. Only buy new birds from a trusted source, e.g. not craigslist.
  6. Watch your flock closely for any signs of illness and report it to your veterinarian and local cooperative extension office immediately.  Signs to look for include: lack of energy and appetite, lowered egg production, misshapen eggs, discolored comb and wattles, diarrhea or sudden death. 
Egg Basket full of three dozen eggs

Has HPAI impacted your flock? What have you done to protect your birds? Please share any advice that will help all of us stay safe.