Garlic Harvest!

Don’t know about you, but it’s getting pretty steamy in the Mid-Atlantic. As we head into peak harvest season, that’s when I find it most challenging to get out in the garden if I don’t go first thing in the morning. Every day is pretty hot and humid (think about walking through soup and you’ll get the idea) and we get a lot of afternoon thunderstorms that are quite strong.  We lost power the other day for about four hours after a storm but thankfully it came back on right around 9:30pm for bedtime.

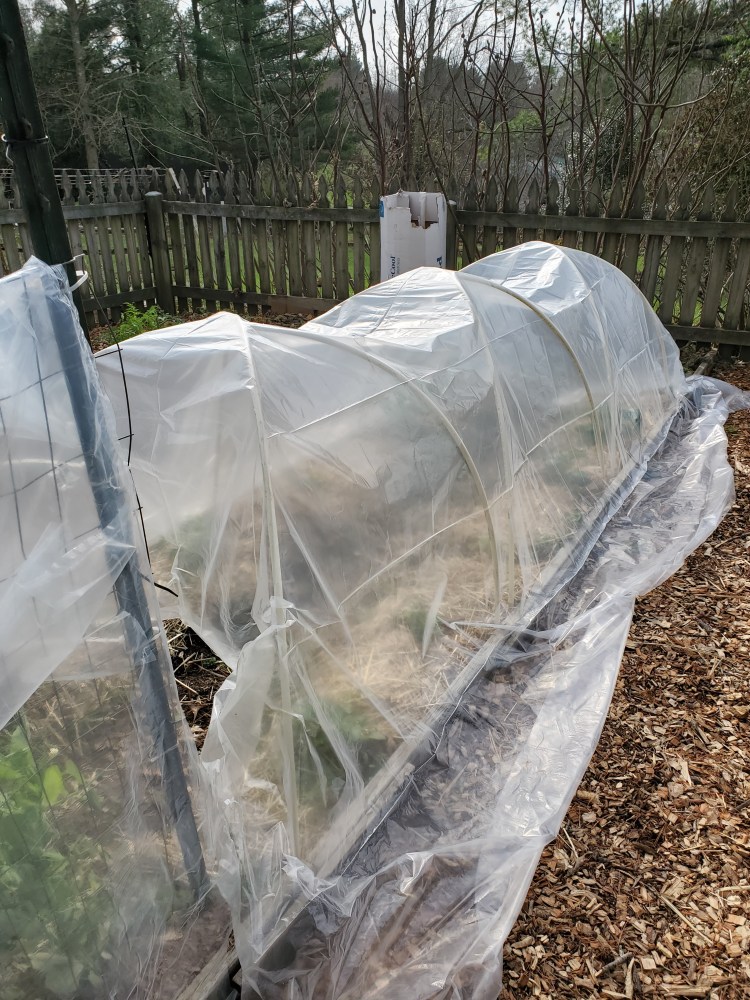
Mid- to late June is typically the time when garlic is ready to be harvested. I planted a half pound of Music Garlic in early November last year so that it would get a good 7-8 months of growing time. Last November was so mild the cloves sprouted before December so I covered them with a really thick layer of leaves and then lightly covered the bed with a layer of cardboard for the winter. I removed the cardboard in early April.

April was still pretty cold and wet so in May I started checking on the garlic every week or so. I trimmed the curly scapes that shoot up through the center so that the growth and energy would be focused toward the bulb. Then throughout June I kept checking to see when the lower layer of leaves would turn brown. That’s the sign garlic is ready to be harvested.

Garlic Harvesting Tips

  1. When the lower layer of leaves has turned brown, pick a day or time when the soil will be relatively dry.  Not right after a big rainstorm or watering.
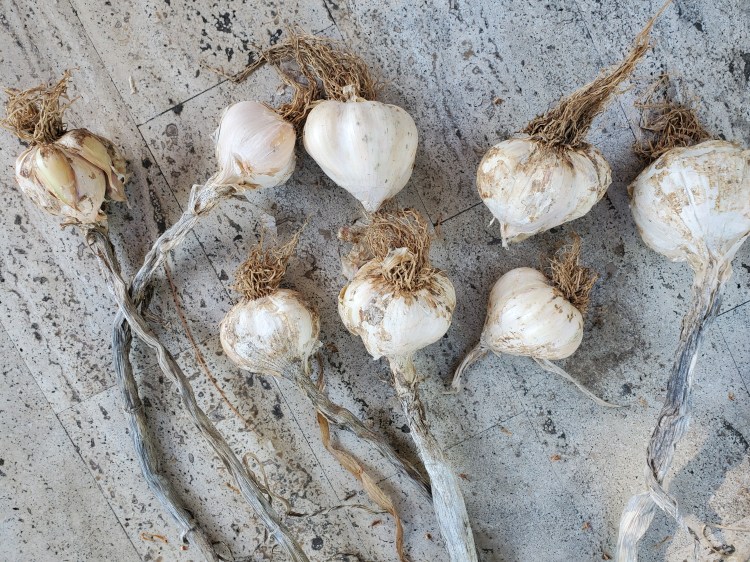
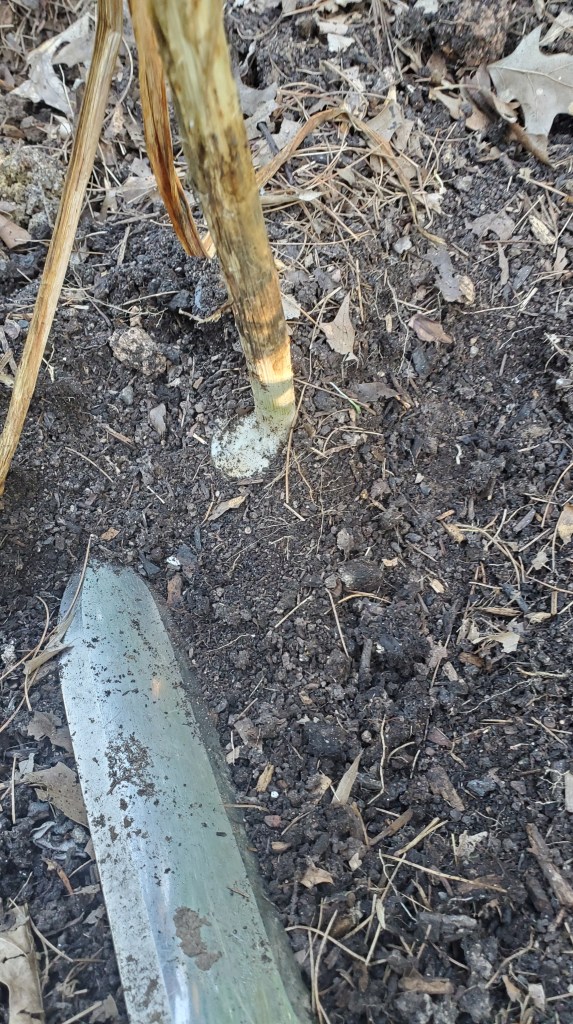
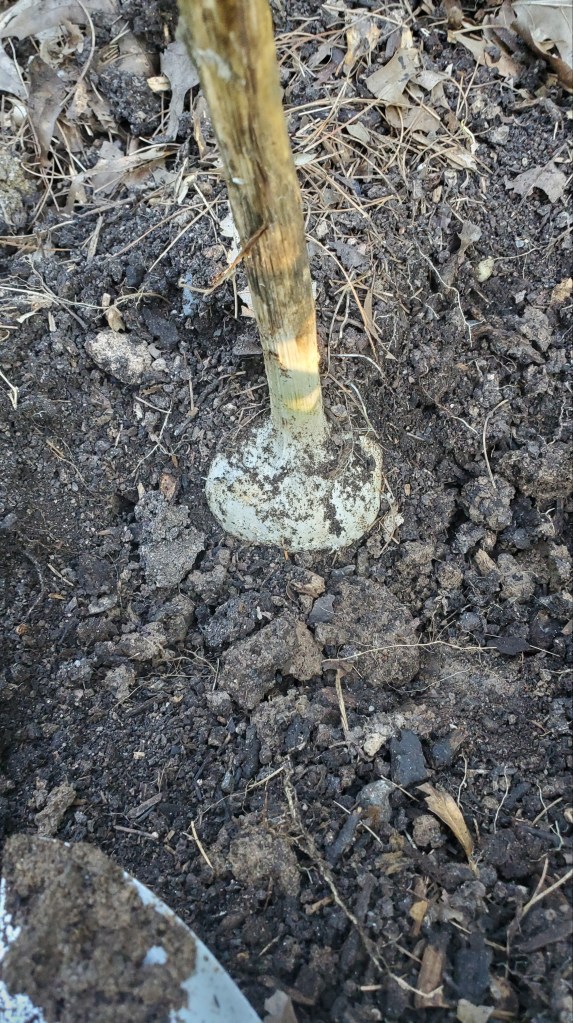
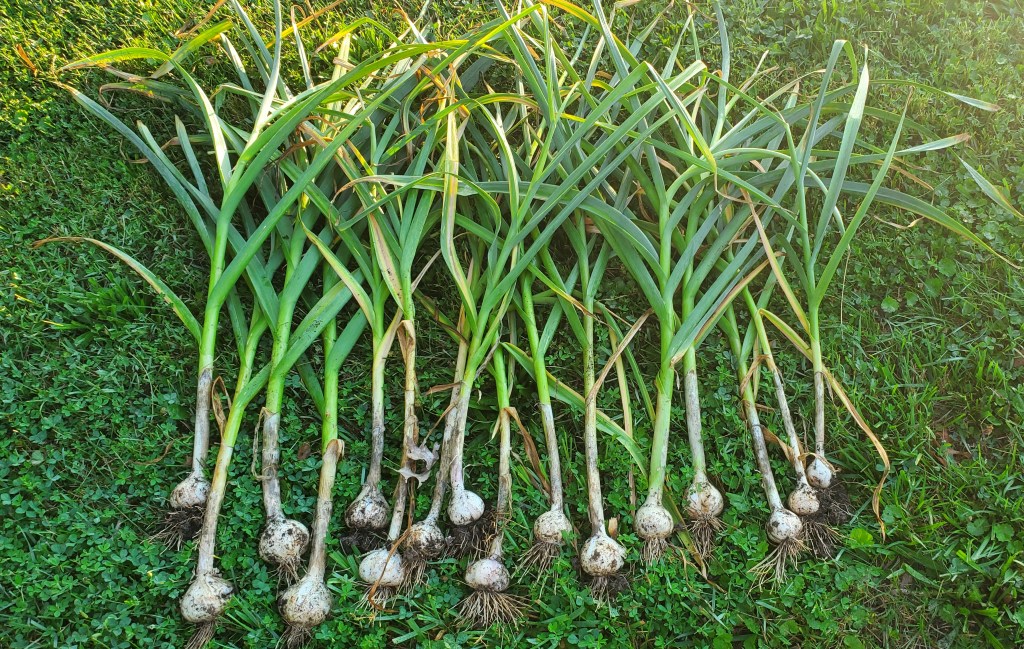
  2. Harvest carefully using a hand shovel to dig around and loosen the roots. You DO NOT want to just grab the stalk and try to pull it out. Be careful to not pierce the bulb as that will mean you’ll need to use that bulb sooner than later and it isn’t suitable for storing.
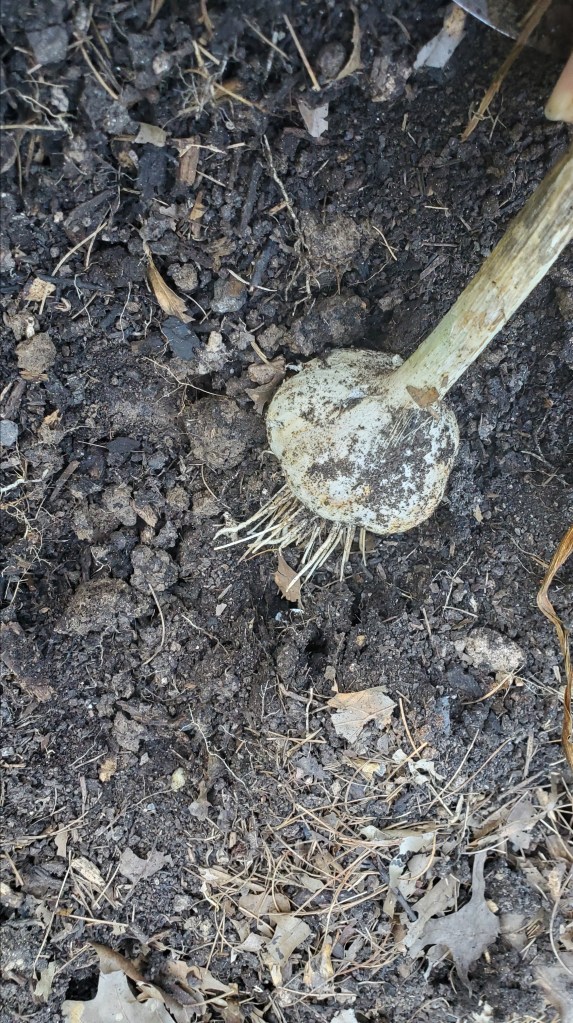
  3. Once you’ve dug up all your bulbs, no need to hose them down.  You can just shake or brush off the extra soil.
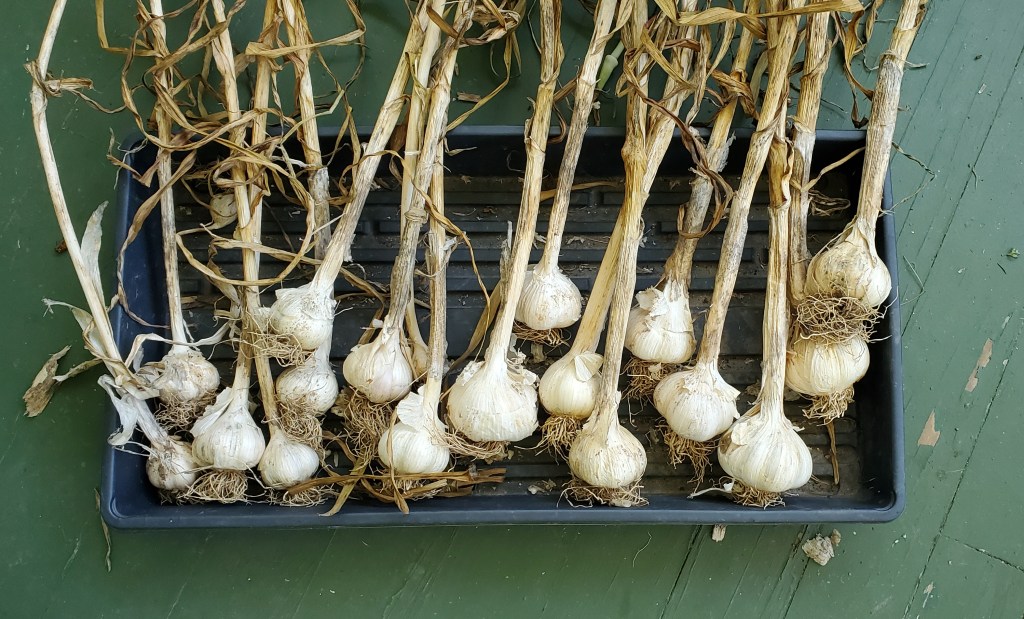
  4. Leave your garlic in dry, shady, cool place for 3-4 weeks so it can cure. I see lots of examples of people leaving them on a picnic table or extra piece of fencing that will allow for air flow. I left mine on our front porch because it’s shaded and gets the northern exposure so it’s a bit cooler throughout the day.
  5. After 3-4 weeks, you can trim the roots around the bottom and leave about a half inch on the neck. 
  6. Garlic should be stored in a cool location, out of direct sunlight, that gets good air flow.
  7. Eventually, you’ll want to store enough to plant your next crop and still have enough leftover for your cooking needs for the year (which is different for every household).

Happy Garlicking!!!

A Garden Calendar that Gives Room to Breathe

As another growing season approaches, I wanted to step back and think about the rhythm and timing of my plantings. For me, having a plan is essential so that I don’t get overwhelmed. But I don’t really want to live my gardening life according to a highly complex excel spreadsheet with tons of equations.

This year, I am not going to expand my vegetable garden and want to keep it pretty similar to what I did last year with a few tweaks. However, I am planning to really give a big push to flower growing thus I want the vegetables to be relatively simple.

I don’t know about you, but the whole “start this 8-10 weeks before your last frost” feels a little too abstract.  I’d rather work with the natural demarcations in the calendar year that signal, “Oh, it’s Spring solstice, time to… [insert task here].”  In the three short years I’ve been gardening, I’ve already grown to love these little tricks because Lord knows my memory is not superb.

Here are the broad strokes and signals that work for me in the Mid-Atlantic and maybe they’ll be helpful to you.

Valentine’s Day (or a weekend thereabout) is when I start peppers indoors.  Think spicy romance!

St Patty’s Day is the time to start tomatoes seedlings. 

Depending on when Easter falls, that’s usually the time to get my spring garden planted with the cold hardy crops – beets, carrots, kale, lettuces, onions and peas.

Then there’s Memorial Day to seed the summer garden and transplant the tomatoes and peppers that I started indoors.

4th of July is a good time to start your fall seedlings indoors, like broccoli, cauliflower and brussels sprouts.

Labor Day, in addition to being the end of my energy and enthusiasm, is when I start letting my beds rest a bit. Just some lettuces, radishes, beets and transplanting the brassicas I started indoors.

Halloween is usually the turning point from enjoyable Fall weather with sunny days to colder, gray days with rain and wind.  Halloween is my signal to go buy some manure from the horse rescue that’s nearby to amend my garden and start putting everything to rest.

Thanksgiving to Christmas is the time to be thumbing through seed catalogues and singing “my favorite things” as I pick out seeds for next year’s garden.

Here Come the Fall Crops

I don’t know about you but the weather this summer is no joke. For me, it’s either blazing hot or pouring rain. My plants seem like they don’t know what to do and every day I’m just trying to decide whether it will rain that evening or not and if I need to water plants.

Depending on your growing zone, you may have already started your fall crops indoors. I’m in the Mid-Atlantic in 7a so end of July/early August is that time for me.  Last year I bought starts from the nursery for brussels sprouts and broccoli so this year I am attempting to grow them from seed myself and will start them indoors along with my *wildcard* crop cabbage.  It’s a wildcard because I’m just going to experiment with about four of them and see how my luck goes. My hope is to make sauerkraut for some good probiotics during the winter.  Everything else – beets, collards, kale, radish and spinach – I’ll direct sow in early September.

As you may have surmised, here’s where timing and space get a bit tricky. All my main summer crops – beans, peppers, squash and tomatoes – are in full swing thus there isn’t much available space. I do have two small open beds where my onions and garlic failed and where I’ve already harvested all my carrots. However, I want to put down a cover crop in one of them to help build up the soil. Sort of feels like a game of Tetris sometimes. Anybody else feel that way?  I’d love to know how you all inter-plant different crops as the seasons are changing.

Update: I did want to re-visit the ‘tomato wall’ that I newly established this year to give you an update. The last two years all my tomato plants became an unmanageable jungle: year one was tomato cages and year two was an A-frame support structure. Neither of which worked well once there were big fruits that needed substantial support. I didn’t want another year of disappointing results which is why I tried fencing and T-posts and tomato clips. Sooooo <drum roll please> the tomato wall is going extremely well and I’m really happy with the results so far! I planted my paste tomatoes together, my German pinks for canning all together, and then my little cherry tomatoes for salads and snacking together. Check them out!

Who’s in your Garden?

Do you know who is in your garden right now? I mean, do you really know?  The only way to know is by visiting your garden at different times throughout the day. Yes, I know that takes a little more time and planning but you can be smart about it. For example, do your weeding in the morning on Mondays and Wednesdays, and do your watering in the evenings on Tuesday, Thursdays and Saturdays.  Midday is hottest and I’d venture to guess you’ll see the least action but hang out for 5-10 minutes and just browse your beds slowly. Usually we’re so focused on completing a task that sometimes we don’t stop to just observe and you’ll be surprised to learn who is creeping around. There’s a black snake that sleeps under the bin where I store stuff and there are two crows who dart in and out of my berries.

In the mid-Atlantic my two garden frenemies are squash bugs and Japanese beetles. Last year the squash bugs decimated my zucchini and cucumbers. The year before that the Japanese beetles feasted on my beans. It’s so frustrating to put in all the work, see everything start to blossom, and then from one week to the next, game over.

I prefer not to use any pesticides in my garden, so this year I’ve been focused on two strategies – prevention or distraction. 

Prevention: I go out to my garden nearly every morning and inspect my squash plants. I turn over the leaves and I examine the stems of the plants. You’d be amazed at all the critters you find hanging out, to which I say, “Grrr, nobody invited you to this party!” I typically just smoosh them with my hand and if I see eggs on the leaves, I scrape them off with my finger nail. I’m also experimenting with a spray I made myself (#MIM) of 1 tsp peppermint oil and 1 tsp tea tree oil in 1 cup of water. After I’ve cleaned away the critters, I’m spraying the underside of the leaves and it seems to be working. The other prevention strategy is to keep your squash plants covered with fabric. I will likely experiment with this next year.

Distraction: You may want to consider various options for companion planting, nasturtium is highly recommended and I planted it near my beans, peas and asparagus and to be honest I don’t see a lot of bug action in those areas so it seems to be working. The other approach I’m using is planting a few of the crops I really want to ensure succeed in different locations, for example a big container near my front porch. I know the bugs can still find them but I’m hoping they leave these ones alone. Along these same lines is to stagger your planting. Such as putting out 3-4 squash plants in June, and then 3-4 more in July if your growing zone accommodates this. I guess it’s technically more sacrificial than distracting but it’s working so far.

Vertical Gardening – Strawberries and Tomatoes

In addition to starting another garden row, I wanted to experiment with growing more crops vertically this year. I bought a GreenStalk planter and decided to use it for my strawberries. Two years ago the bunnies had quite the buffet at my expense so I thought growing them in this planter might offer more protection. And strawberry plants are perennials in the sense that they send runners out that will create new plants which means more harvest and less work *hopefully*. Though the first year is not meant to be a huge production but moreso about the plants getting established. I bought half June-bearing and the other half everbearing plants. My thinking on this was the everbearing will give us berries all summer long and the June-bearing will provide a good harvest all at once that I can use for jam and jelly. And this is a fun little set up for kids to be involved with because they can walk by and grab a berry.

Vertical gardening for strawberries with a greenstalk planter

The end of May is also when I wanted to get all my tomato plants in the ground. I had quite a lot of anxiety about this because I grew all my plants from seed this year so getting them in the ground was pretty close to giving birth with regard to the anticipation and nerves. I’ve been hardening them off gradually the last two weeks, taking them outside for 2 hours in the morning, then 3, then 4, then 5 and working my way up to 8 hours total.

Coincidentally, where I planned to plant the tomatoes was the same space I had planted all my cauliflower and broccoli in. But these brassicas have been maturing so slowly that I’ve been delaying and delaying getting the tomatoes in the ground. Over the last week I just decided I would harvest the heads of cauliflower and forget the rest. I had been told by a few people that doing brassicas in the spring was quite challenging (due to the shortened growing time as the weather typically goes from cool to hot with little transition) and better to try in the fall. But I had to see for myself and they were right 😉

My plan was to create a better supported and more vertical setup for the tomatoes this year. (FYI – the A-frame you see in lots of posts did not work for me last year.) At the farm where I volunteer, they used a setup I really liked and had the supplies for, essentially T-posts and fencing.

Set your tomatoes up for success – here’s what I did:

I spaced my T-posts 5 feet apart and secured the fencing with 3 zip ties to each post.

I dug approximately 12-inch-deep holes in an offset pattern along the fencing, making a zig zag pattern.  On one side of the fence they are 24 inches apart, but the nearest plant is 12 inches away on the opposite side of the fence. (I am hoping this doesn’t come back to haunt me.)

I put a handful of peat moss, and about 2 tablespoons each of fertilizer and crushed egg shells in every hole, mixed it up with compost and soil and then placed my seedlings in. Tomatoes need to be pretty deep down to help establish strong root systems and the peat moss should help with that as well. I think coco coir is a more environmentally friendly option but I couldn’t find any at the local hardware store. The egg shells provide calcium and along with the peat moss help to make the dense, clay soil we have here a little more light and aerated.

Not all of them are tall enough to reach the fence just yet, but for those that are I am clipping them with these handy tomato clips.

All in all, it took me about 2 hours with the help of Cactus installing the T-posts, to plant my 15 tomato plants. These are my babies and I am so excited to see how they grow.

Like Peppers and TOMATOES (or peas and carrots ;)

It’s finally here!  The time we’ve all been waiting for (I feel like Anna in Frozen). The time to start your peppers and tomatoes. Not exactly sure why there is so much excitement around tomatoes and peppers (I’m personally more of a green bean and squash kind of girl) but I’m guessing because we are all so ready to be outside in our gardens and this is a tell-tale sign that we are getting closer to Spring.  Yipppeeee!

I’m not going to walk you through how to start seedlings – there are a gajillion videos you can watch that detail every step (here’s a good one from The Rusted Garden).  What I am going to share are a few of the tips and tricks I wish I had known my first two years.

Supplies:

  • Grow lights – 3000-5000 Lumens and you want them to be ‘daylight’ (These should cost you no more than $20-40 and will last many, many years. You can see the sale sticker on mine from home depot.)
  • Growing medium –
  • Cells or containers – recycle something if you can, e.g. clamshells, egg trays, plastic cups.
  • Water
  • Fertilizer – I’m using Agro Thrive this year
  • Labels – popsicle sticks, toothpicks with a post it, paint stirrers

Timing: Don’t be like me and start everything in February (depending on your growing zone) and then lose steam by early April so that you end up having to buy starts at your local nursery. Slow and steady wins this race. And by staggering your start you give yourself time to work out any kinks in your setup – like lighting, watering, feeding, etc.

  • Hot peppers need to be started 10-12 weeks before your last frost date.
  • Sweet peppers need to be started 8-10 weeks before your last frost date.
  • Tomatoes can be started 6-8 weeks before your last frost date.

Start:

  • Get a growing mix that is a mix of peat moss, perlite and vermiculite. This means there is no organic material in it and you must use a fertilizer within a few weeks. (I did not do this in the past and after about 4-5 weeks I never understood why mine became leggy and withered. Shocker!)
  • Moisten and pack the mix into your containers or cells.
  • Put 2-3 seeds in each cell or container.
  • Label what you planted with the date.
  • Leave the containers in a warm spot for Days 1-3.
LED shop lights, 3400 lumens

Germinate:

  • Days 4-7: give them 24 hours of light
  • Days 8-14 (week 2): give them 16 hours of daylight.  Most if not all should have sprouted by the end of the second week.

Maintain:

  • Week 3 and beyond: give them 12 hours of daylight.
  • Water weekly when you notice the growing medium has become a very light brown and is dry to the touch.
  • Feed weekly at a very diluted ratio, as close to 1:1:1 (N-P-K) as you can get.
  • Watering and feeding are not the same, but you may do them simultaneously.  Do NOT overwater and have constantly soaking wet soil.  You are going to get mold. Water from the bottom so the roots can soak up. Similarly do not overfeed thinking you’ll get super human plants. Too much of a good thing is not good 😊
  • Have a fan in the room to create some air flow to avoid the above mentioned mold issue and to help your starts get stronger.

That’s all folks.  It’s not rocket science but you do need a few essentials to get started and then Va-Va-Voila!  Vegetables in your backyard.

How to Make a Low Tunnel

A few weeks back in discussing my fall garden, I referenced that I would be pilot-testing a low tunnel on one of my garden rows. I want to see how/if I can keep my broccoli and cauliflower growing as our temps begin to drop below freezing on a nightly basis. I wasn’t going at this from a particularly evidence-based or scientific approach and largely wanted to use materials I had on hand. One of my favorite sayings is, “when in doubt, recycle!” Ha, that’s not a saying but it should be. We have been very lucky in that the previous owners of this property left lots of tools and supplies, in addition to the fact that Cactus loves picking up “the best trash” from people’s driveways on trash day. And over the last two years I keep having creative spurts for projects that can utilize something I saw in our shed, workshop or barn.

Here is the SUPER simple approach I took:

  1. Identify the location I wanted for the low tunnel.
  2. Determine the size of the low tunnel – how long did I want it to be? I suggest starting small.
  3. What did I want to use for my support structure?  The sky (or shed or wallet) is the limit here, friends. You can be really creative (and frugal) and pretty much use anything – PVC, mesh fence, bamboo, tomato cages, etc.
  4. Figure out how many supports I need. I wanted my supports to be pretty close together so that the cover doesn’t sink in as we get more moisture.
  5. How did I need to anchor my supports? Can they go right in the ground or do they need to be fastened to something? Cactus bought me these thinking we would nail them to the boards that divide my garden rows.
  6. What do I want to cover it with? There are (you guessed it!) lots of options on this front too, but I went with the material I had on hand.
  7. How do I want to fasten/attach the covering to the supports? There are probably 517 ways you can attach the thermal covering but I would recommend keeping in mind that you will likely want to remove and re-attach the covering depending on the weather. You will also want to consider what sort of weather it will need to endure – wind, rain, snow, sleet, etc.

Supplies I used:

  • Eight 1/2” ten foot long PVC tubes
  • PVC clamps
  • Plastic sheeting
  • Two sets of hands
  • One brain (being generous 😉)

Steps I followed:

  1. Gather supplies and bring them to my garden.
  2. Ask Cactus to hold opposite end of each PVC line. 
  3. At this point, as we were about to attach each end of the PVC to the row border with the above clips, Cactus suggested why not just push them into the ground and see if they will be secure enough.
  4. Ta-da, we saved ourselves the work of screwing and measuring and aligning, and were done in about 5 minutes.
  5. We aligned the PVC pipes to make ‘X’s’ thinking that would be stronger support than individual hoops. 
  6. Overlay the plastic sheeting on top of the PVC tunnel.
  7. Secure with your choice of tomato clips, bricks, 2x4s. I laid 3 bricks down each side.

I’ll keep you posted on how effective this little tunnel is. I’m pretty sure the plastic sheeting is not the right material, but I’m recycling an item I have before buying something new.

The Fall Garden

Okey dokey artichokey. It’s been 93+ degrees for what feels like the last three weeks straight so you know what I’m thinking about… FALL! This happened to me last year. It’s August, it’s hot as heck, I’m tired of sweating from every crevice of my body so I start daydreaming about cool, crisp mornings and the leaves changing color. I’m basically the inverse of Olaf. I’m more of a Spring and Fall person now and could do without the blazing summer heat that makes it so I don’t want to be outside between the hours of 10am-7pm. Oh, and then there’s the mosquitoes. But please stop me. 

Planting cool weather crops in the heat of summer is a bit tricky. Seeds won’t germinate as easily in the warm soil. I know this because I put beet seeds in about two weeks ago in the shadiest spot of my garden and nothing happened. So I’ve been holding out for a few days where the temps will be slightly lower and next week looks like my chance. Honestly, I’m not sure if there is much urgency to plant at the beginning of August since the crops on my list should all be pretty frost hardy and can make it to early November. I’ll give it a whirl and may resort to starting them indoors just as an experiment.

Here’s what I’m planting from seed (and I’m zone 7 for what it’s worth). For fun, I’m also grabbing some Brussels sprout seedlings from a local nursery just to see if they grow.

  • Beets
  • Kale
  • Peas
  • Sugar snap peas
  • Broccoli
  • Cauliflower
  • Lettuces
11 seed packets for fall crops

In other news, we harvested our first two meat chickens. Yeah, could have gone without that life experience. I’ll be pondering this for a bit before we decide to raise more next year. These guys were given to us and we did not know they were meat chickens so turned out to be more of a “gift” than we realized. Definitely makes my plant-based eating hit closer to home. I’m sure we’d all eat a lot less meat if we raised and butchered it ourselves.

Summer Harvest

Life has been pushing me. I’m literally looking up at the sky saying, What next?!? Aside from getting punched in the stomach and throat with life-altering news last month, the chicken drama has continued (let me repeat: NEVER buy chickens on craigslist), and the stand-alone freezer in our mud room stopped working, in addition to the freezer of our fridge not cooling properly. Is it wrong that I’m having fantasies of walking away from an explosion in slow motion (a la every action movie ever) with some dirt on my face, my biceps bulging, wearing ripped jeans? I seriously want to light a match to my life right now (not literally of course).

To cope I’ve been doing the time-tested approach of denial distraction. Staying as busy as I can in this sweltering heat. Out in the garden most mornings – weeding, pruning, watering and picking.  I’ve said this before but the major positive of staying at home is more time in the garden (and, errr, with my family of course ;).

Here’s what my summer harvest is showing: carrots are cranking, green and wax beans are all over the place (must trellis these differently), two ginormous zucchinis and nothing more from that plant which feels like I did something wrong, the garlic I never knew I planted all fell over so I knew it was time to pull them and I got about 8 decent bulbs. And the blackberries just won’t stop. Japanese beetles ravaged my green beans last year and this year they are all over the berries.

Lettuce is pretty much down for now (I’ll wait until it cools off to plant more) and all my tomatoes are on the way, just starting to eat a few cherry ones (seems late). My corn is looking good, my butternut squash plant has at least 10 growing, but my cucumbers are not really producing. I also have three surprise pumpkins that are clearly an accident (must have come from the compost).

I’ve made some attempts at preserving as well. Let me tell you, the first run of the pressure cooker was such an ordeal. It’s not complicated or even difficult, I think I just psyched myself about all the ways I could mess up.  Eventually, two and a half hours later, I had 6 pints of green beans. Wahoo – small wins! I’ll do a post soon on “the more you know.” My main question is will any of this stuff taste good? I could do like 40 pints that aren’t tasty and then what? Trial and error I guess 

Canned:
-green beans – 9 pints
-pickled beets – 5 pints
-blackberry jam – 16 half pints
-blackberry pie filling – 4 quart

pints, half pints and quarts of beets, beans and blackberries

I also froze two gallon bags of blackberries.

Well, I’ll be keeping going and I’m sure you will too. Things will get better and it reminds me of the scene from one of my favorite films from teenage-hood Good Will Hunting. Robin Williams and Matt Damon (call me!) are talking during one of their sessions and Robin says “You’ll have bad times, which wake you up to the good stuff you weren’t paying attention to.” I guess it was my time to get woke.

Getting the Garden in the Ground

It feels like a lot has happened in the last two weeks. COVID-19 appears to be slightly loosening its grip on our daily lives and that’s hopeful. I know that isn’t the case everywhere and I’m certainly not supporting any premature relaxing of restrictions – the digital signage on the highway where I live still says “safer at home.” I personally think this virus will play a starring role on the global stage for at least another year. But I’ve been trying to focus on the things within my control and what I can influence to stay healthy. Ups and downs though, like everything. Rarely is anything in my life a linear and even paced arrow toward a target.

I got all my plants in the ground between May 14 and May 19. This gave a very generous three-week window after the last average frost date of April 21. I have read that giving a little extra time can be the difference between success and a lot of disappointment. With the weather here in the mid-Atlantic so wet and much cooler than normal I was in no rush.  I think it was the right call.

Here’s what I got done –

  • Peppers – my seedlings were not as strong as I would have hoped but I just had to plant them and see if they hang on.  If not, I’ll have to buy a few starts from the nursery.
  • Tomatoes – my seedlings never really advanced beyond the spindly, thin stage. After the second set of leaves came in, that was sort of it.  In hindsight, I don’t think I had enough nutrition in my growing medium. I opted to go by six heirloom plants from the nursery. I’m disappointed about this but it was a good learning for next year.
  • Beans – I’ve got three varieties of bush beans and one pole bean.  I learned last year to sprout them first, which only means wrapping them in a moist cloth (you can use a wash cloth, paper towel, cut up t-shirt, etc.) and leave them in a produce bag on the windowsill for a 2-3 days. Then gently remove them and plant them right away.
  • Cucumbers and Peas – built a trellis with old tomato cages by cutting the wire to essentially break the cage, bent them flat, and then zip tied a few old garden stakes across (see below).

You may recall the sadness and tragedy I experienced last year when deer ate all my luscious blueberries in one weekend.  Well, fool me once but not fool me twice. To ensure this doesn’t happen again, Cactus and I spent about four hours installing an electric fence around the berry patch. This is an area about 20×30 feet and we already had the poly wire and enough step in posts so hoped it would be a relatively easy project.  Cactus bought a solar powered fence charger from TSC and we figured it out pretty quickly watching this series of videos from McGregor Electric. The thing we had the most trouble with was determining what was grounding out the charge. I also wanted to expand our blueberry bounty so bought two additional bushes – Blue Gold and Duke. 

There’s a separate garden bed in the berry patch that I didn’t use last year, largely because it was free reign for the deer.  Since we got the fence installed, I decided to try corn, butternut squash and watermelon.

The black raspberry bushes are blooming beautifully and look way more full than last year. And fingers crossed that we’ll actually enjoy some figs this year. We put lots of leaves around the roots to keep them insulated during the winter and it was a very mild winter so it seems promising.

Close up of small fig growing on bush

How to Make a Trellis with Two Tomato Cages: